
Hello,here you can find some detailed information about the visual system (and its evolution).
The final decision to switch to the projector solution was based on my wish for maximum immersion effect. The use of three big monitors had the advantage of a very good picture quality. But the FOV was only 80 till 90 degree. So you have to make a choice between picture quality and FOV (Immersion)…
The installation of the new visual system needs a lot of research and planning activities. The complete project can be divided in to 4 categories of planning.
– Layout
– Projector
– Curved Screen
– Hard & Software
1. The Layout
The first thing to consider is the ammount of space you have available. The projector solution consumes the most space (in comparison to Monitor or Screen Solution). So take out your folding rule or measurement device and take the measurements of your room. Then you know the maximum possible diameter of the curved screen you can use within the room. You should always go for the possible maximum as it makes everything else more easy.
I ended up with a diameter of 3.4m for the screen. The center point of the circle should be the eye point of you, sitting in the cockpit seat. If you have a FO seat as well, the eye point should be defined above the fire handles. All points on the curved screen have the same distance to that point.
The Screen covers 225 degree field of view around the eyepoint. The stretched distance of the screen is 6,74m.
The screen is divided into three areas. Each area is covered by one projector. Keep in mind that you need to overlap these areas by approx. 10 % to get optimal results with the edge blending (I had to use smaller overlap). Now you can measure the width of each area. I ended up with a width of approx 2.3m. 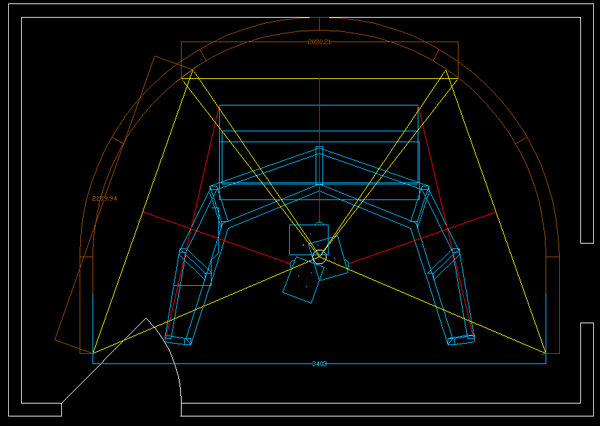
2. Projector choice
The two most important projector specifications for the homecockpit builders are: a.) Throw ratio and b.) resolution
a.) Throw ration: this value determines the distance of the projector you need to get a specified image with. TR=D/W
My calculated image width is 2.3m. If i would use a standard projector with a throw ration of 1 I would need to place the projector 2.3m away from the curved screen. The cockpit shell would generate shadow problems (as it would be in the way of the projector beam). .
What you need is a short throw or ultra short throw projector. These usually have a throw ration of 0,7 or even 0,49. My projectors have a ration of 0,52. So the distance to the screen is 1,2m. This value defines the position of the projector lens.
b.) The resolution of the projector is important for the image quality. The current standard is full HD with a resolution of 1920×1080. You can get moderate priced projectors with that resolution fairly easy. Unfortunately, there are no affordable full HD projectors on the market with a sufficient throw ration (smaller 0,7). So i decided to go for projectors with a resolution of 1280×800 (WXGA) and a throw ration of 0,52. The final decision was made and i bought 3 x Acer 1370 WHN. The average price for one of them was 650 €.(Urghhh)
3. Curved screen:
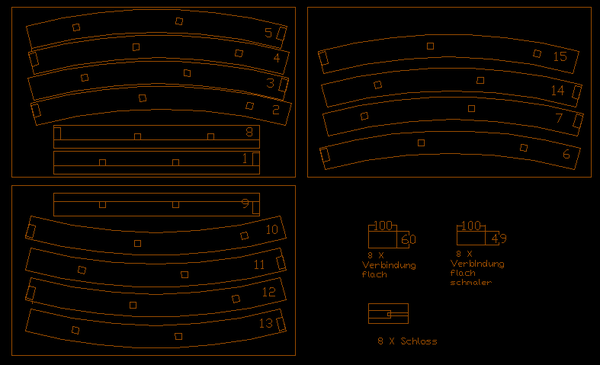
The measurements for the curved screen are defined by the space restrictions of the room. In the layout process i figured out, that the maximum diameter of the screen could be 3.4 meter. I prefered a modular approach for the screen. The advantages are clear: The screen can be moved in and out of the room, i can make the parts on my CNC machines worktable (size) and the transportation of raw material from shop to your home is much easier. The curved screen has been designed in Autocad. I used a sandwich approach. On my CNC machine i made top and bottom “guiding rails” with pockets for the struts. You can see the drawing used for the CNC machine below. The material for the top and bottom parts is 22mm strong MDF. The struts are 21x21x1520 mm timber beams. 3mm strong HDF material is screwed onto the struts and represents that actual projection screen.
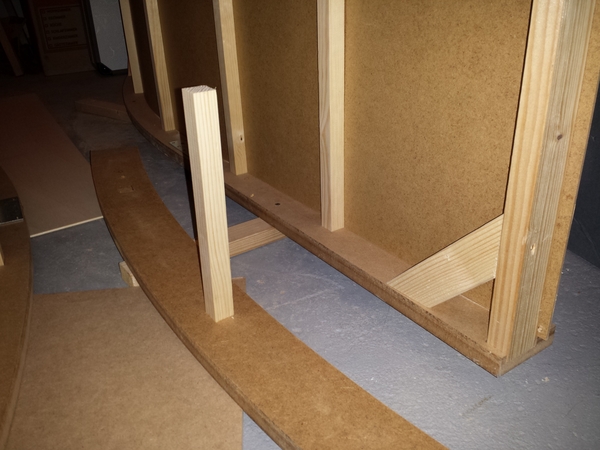
Detail of Strut which has been inserted into the pocket of the rail.
Basic Dimensions: Diameter 3.4 m; Height 1.5m; Width of rails 80mm; Thickness of screen 3mm plus color layers…
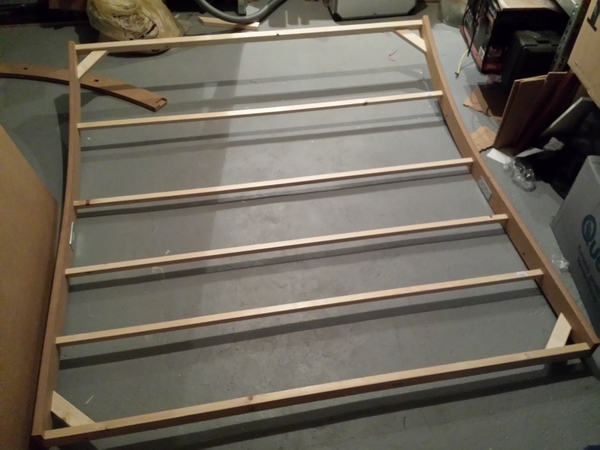
After the HDF sheets have been screwed onto the struts, i used wood filler to fill up the counter sunk holes of the screw heads. This is an important step as you want to have a smooth surface.
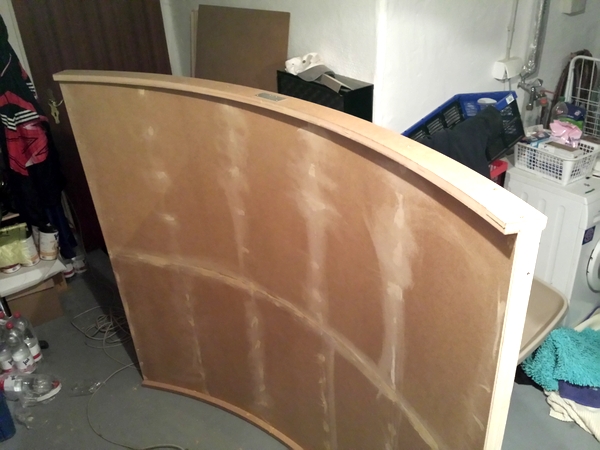
Filling Material and Grinding is needed to get a smooth surface
After appliing the first layer of paint – i figured out, that there are still some holes or uneven areas on the surface. So i applied more filler and ground it again.  In the end there will be 3 or 4 layer of Alpina white paint. The Alpina brand is expensive, but has more white color pigments per unit than cheaper brands. So you need less layers to get a perfect white finish. In the internet you can find a lot of discussions about the best material to use for a curved screen. I decided to go with the Alpina paint solution. It was suggested by a colleague of mine and i think it is a good and “relative” cheap solution. The simulator is operated in a darkened room, so the projector does not compete against daylight influence. So the Gain value of the painted surface should be sufficient.
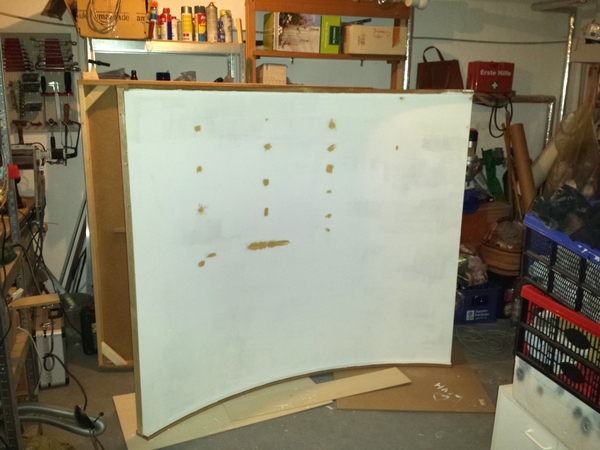
First Layer of paint has been applied, more filling needed
The preparation of the 4 segments took me 2 weeks.
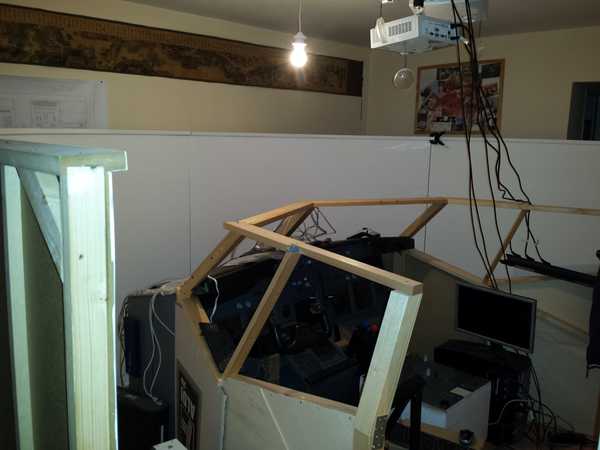
Curved Screen installed
The screen segments have been installed in the Simulator room. I put some small rollers under the
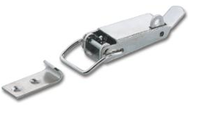
Kistenverschluss
screens to move them around. For the quick connection of the segments i bought the so called “Kisten-Verschluesse” – i do not know how to call in english but you see a picture on the right side. This way i am able to connect the screen segments very quick if i need to move them around in the room. You should look on Ebay to get these. I bought 10 pcs. for 10 €. If you go to Homedepot, OBI etc. – you will pay much more.
Even with the best layout planning it is good to have the possibility to make adjustments to the projectors position after the installation under the ceiling. I used a piece of wood and milled some three long holes inside. The projectors are attached to tubes which can be moved in these long “channels”. See the picture below and you get the idea….
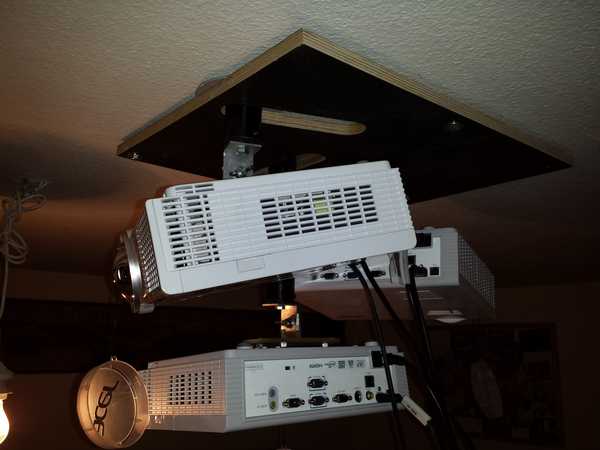
Close-Up of the Projector Holder
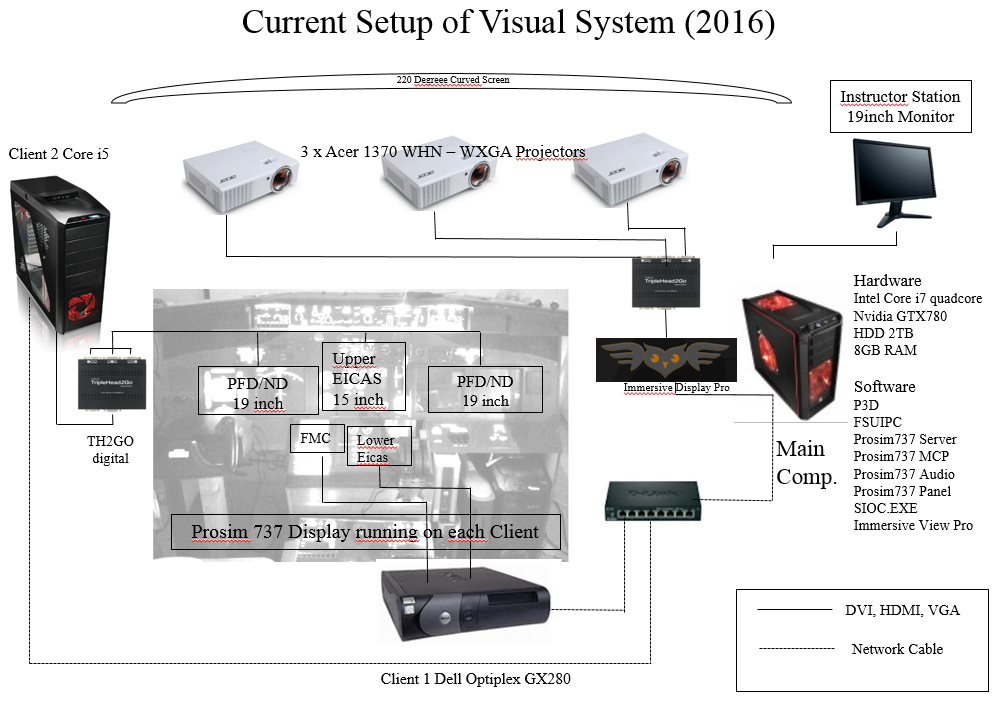
4. Hard & Software
FSX has been on the market since 2006. No matter what kind of computer you had since then, FSX eats it up. This is especially true for a three projector system. In order to get a realistic outside view, you need to create 3 single windows in FSX – this means 3 separate frames need to be rendered. To avoid any bad surprised i bought a new Computer with state of the art hardware. Basically i followed the FSX Bible from Nick Needham wich can be found here.
My updated System specs are:
Intel Core i7 3500k – overclocked to 4300 / Asus Sabertooth Z87 / 8 GB G.Skill Ram 2400 CL11 / 500 GB Velociraptor for FSX / Intel 80 GB SSD for Win7 / Nvidia GTX 780 (Palit super Jetstream)
The Software for the image warping and edge blending is Immersive View Pro from Fly Elise NG. You can check their website here. Prior to the Pro Version i used the Lite 2 version which was ok. But was not 100% satisfied with the adjustment process so i invested more moneay and purchased the Pro Version & Calibration Programm as Bundle. Nikola from Fly-Elise was kind enough to deduct the price i already paid for the Lite 2 version from the Big Bundle. The USB dongle i had for the Light Version was reprogrammed via Teamview. THATS WHAT I CALL CUSTOMER SERVICE !!
To get good results it is necessary to set the correct resolution for the projectors in the Matrox Powerdesk software. As my projectors have a resolution of 1280*800 i need to create a screen with a resolution of 3840*800. With the help of the famous “Windowmaker”-Tool” i got the correct inputs which are needed for a realistic outside view. FSX has to run in Full Screen Mode (ALT+ENTER) on the 3840*800 screen. After hitting CTRL-SHIFT-F12 (The key combination to turn on and off the Warping) i was surprised what massive effect the 225 Degree FOV have !!! Below you can see a picture. Fine tuning for edge blending and color matching still have to be done.
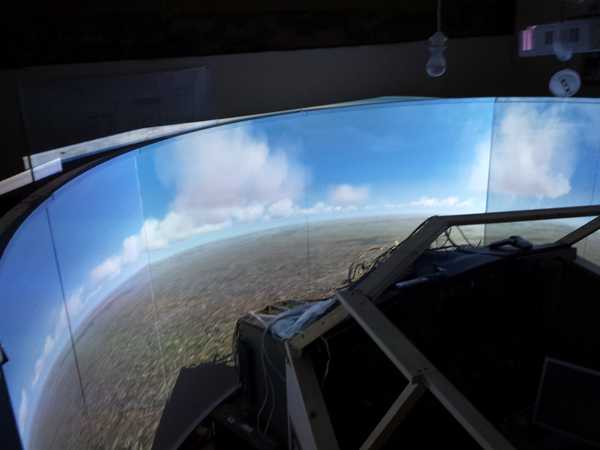
Warped Wrap-Around 200 Degree FOV
Some words about the costs:
- New fast computer system: 1500 €
- 3 x Projector : 1900 €
- Material Curved Screen: 200 €
- Software for Warping: 450 € for Immersive View Pro and Calibration Application
Fortunately i was able to sell the 3 LCD monitors for a very good price and also made some good discount on the projectors. But you won´t get a 225 FOV visualization system for small money !!!
I am 83 yrs old ,using a46inch Samsung screen for flight sim and want to have a larger image,so erected an 100 inch wide flat white screen in front of the pilots seat which is 5ft back from the screen.i do not have any experience with projectors but was considering the Acer s1370 whn when I came across your description and learned more in five minutes than in the previous five days !
Although my screen is flat I would like to get a picture the full width of the screen and 31 inches high(2438mm by 787mm) would that be possible?
Hoping for a reply from you
Thanks
Hallo Andreas
Danke für die ausführliche Beschreibung Deines Visual Systems.
Ich schätze, oberkant Projektionsfläche ist ca. 1.80m. Ist das korrekt?
Wie ist das eigentlich mit der Bildschärfe auf einer gebogenen Leinwand? Stellst Du den Focus so etwa auf einen Mittelwert ein? Nimmt man eine allfällige Unschärfe überhaupt wahr?
Ich denke dran, mir einen 180° screen zu bauen mit 2 W1080ST Projektoren, und bin mir nicht so sicher, wie sich die Plankorrektur auf dem gebogenen Screen auswirkt.
Danke und Gruss
Peter
Hi Peter,
Höhe der Leinwand ist ca. 1.60. Schärfe ist kein Problem bei der gebogenen Wand.
Gruß
A.
Hallo Peter,
Du brauchst auf jeden Fall eine ordentliche Warping Software, z.B.:
http://www.warpalizer.com
Gruß,
Andreas
Hello.
Could you send me the drawing for cnc ?
Thank you very much
Hello.
Could you send me the drawing for cnc ?
Thank you very much
Hi Andreas
I have toyed with the idea of making a flight simulator similar to yours.
The pinch point for me was having enough room to put it in with a wrap around screen like yours.
I do have a spare room but from my calculations I didnt think the room was big enough.
Would you be able to share with me the dimensions of your room, and how your screen fits etc,
I would love to have perhaps a skype conversation one day with you if that is possible
my skype id = ianhutty
Regards
Ian
Will overhead projectors be able to operate with a 3 meter curved screen?
As I am a bit tight for space. Thank you.
hello I also use 3 projectors on a circular screen with a visual 220 fov.ma does not convince me the general result. could you help me telling me please the degrees you have set for the three windows and also the vertical fov. Thank you so much Andrea
Hi, I am wanting to convert a 737 TQ and have watched your video. I am fine with the mechanics and interface with Leo Bodnar PCBs for throttle position input to the PC.
The bit I am struggling with is the output to drive the motors. Have you done it with Arduino?
And if so, would you be able to share any info such as wiring schematic and code please?
Many thanks
Andy